Getting Started with Raspberry Pi Camera
In this tutorial we will go through how to set up the Raspberry Pi Camera. We will go through the installation, enabling camera from the Pi, testing the camera, and writing Python code for taking individual pictures. We will also cover how to set up Node-RED to easily take pictures with the PiCamera or control the camera remotely the PiCamera remotely.
Hardware installation
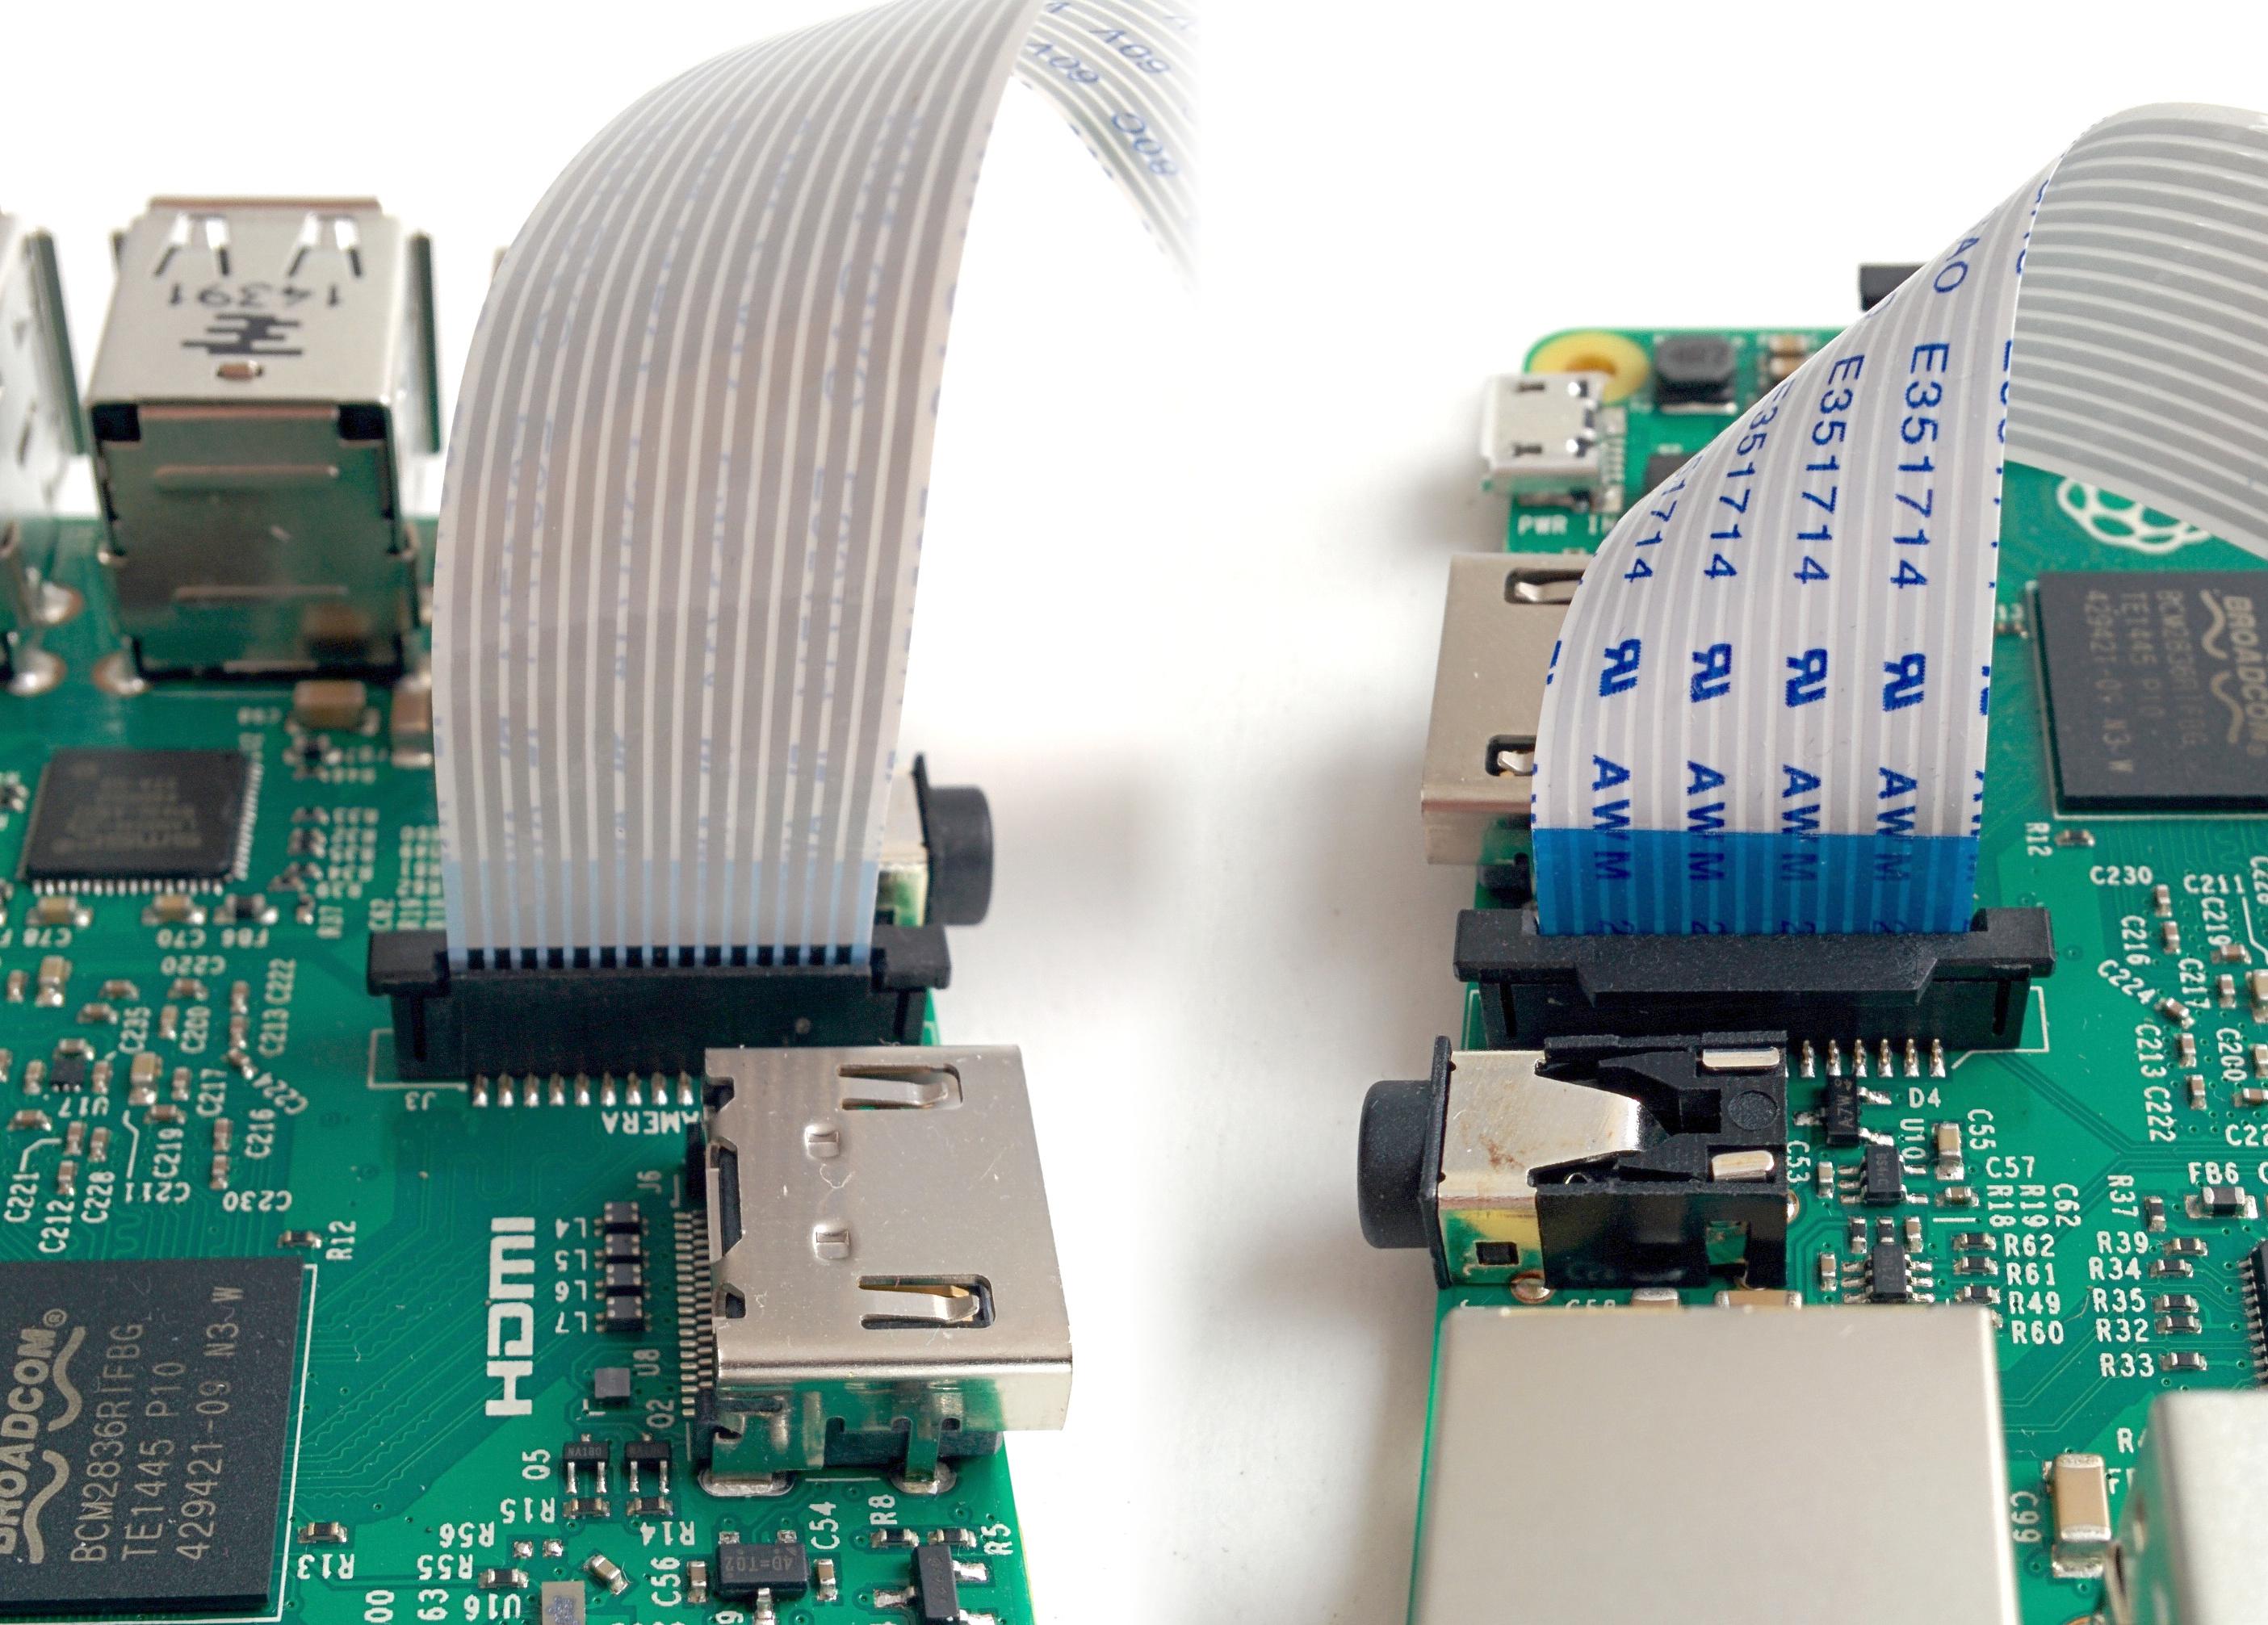
First, find the camera port on the Raspberry Pi 3. It is located right next to the HDMI port. Gently lift the white collar on the port. Next, insert the cable into the camera port, the side with blue texts facing the Ethernet port. Make sure that the cable is inserted all the way in. Gently push down the white collar to secure the cable.

Note
If you also need to have a SenseHAT installed, make sure that you stick the cable through the slot on the SenseHAT first. Otherwise it will be difficult to install the PiCamera after you install SenseHAT.
Software setup
The camera interface on the Raspberry Pi is not turned on by default. You will need to manually turn it on. There are two ways to do this:
- Through the raspi-config utility
- Through the Raspberry Pi settings on the desktop.
Turning on the camera interface through raspi-config
Type the following command in the terminal (located on the task bar, or press Ctrl+Alt+T):
$ sudo raspi-config
In the terminal interface that follows, choose Interfacing Options, and then Camera. Choose yes, save the configuration, and reboot the Raspberry Pi.
Turning on the camera interface through the GUI
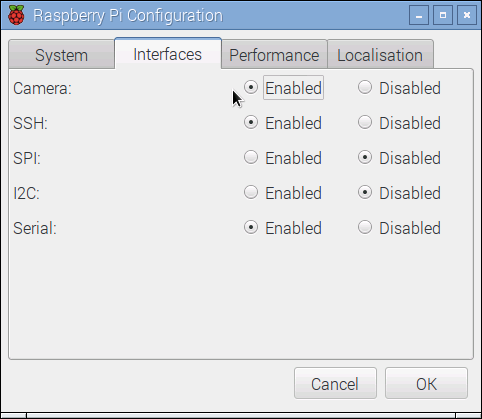
Start the Raspberry Pi Configuration utility and enable the camera module:

You will also need to reboot your Raspberry Pi after this.
Test your configuration
To make sure that your Camera is set up properly, use this command:
$ raspistill -o image.jpg
A preview of the camera should appear, and after 5 seconds, you will see an image called image.jpg in the homepi folder.
Hint
If you are using VNC, you will need to go to settings of the VNC client on the Raspberry Pi. Navigate to Menu > Options > Troubleshooting and select Enable experimental direct capture mode.
Next, make sure that you have the Python library installed. In the terminal, type this:
$ python3 -c "import picamera"
If no error messages pop up, congratulations. You’ve configured your Raspberry Pi correctly.
Programming your PiCamera
Warning
When trying out these scripts do not name your file picamera.py.
Naming scripts after existing Python modules will cause errors when you
try and import those modules (because Python checks the current directory
before checking other paths).
Starting a preview
from picamera import PiCamera
camera = PiCamera()

camera.resolution(1024, 768) # 4:3 aspect ratio
camera.start_preview()
You will need the first two lines before you instruct the PiCamera to do anything. The thrid line sets up the resolution for the camera. The camera supports taking 4K videos at 30FPS!
Taking a picture
from time import sleep
from picamera import PiCamera

camera = PiCamera()
camera.resolution = (1600, 1200) # 4:3 aspect ratio

sleep(2) # warming up
camera.capture('foo.jpg')
Capturing timelapse sequences
The simplest way to capture long time-lapse sequences is with the
capture_continuous() method. With this method, the camera
captures images continually until you tell it to stop. Images are automatically
given unique names and you can easily control the delay between captures. The
following example shows how to capture images with a 5 minute delay between
each shot::
from time import sleep
from picamera import PiCamera

camera = PiCamera()
camera.start_preview()
sleep(2)
for filename in camera.capture_continuous('img{counter:03d}.jpg'):
    print('Captured %s' % filename)
    sleep(300) # wait 5 minutes
However, you may wish to capture images at a particular time, say at the start of every hour. This simply requires a refinement of the delay in the loop (the
datetime module is slightly easier to use for calculating dates and
times; this example also demonstrates the timestamp template in the
captured filenames)::
from time import sleep
from picamera import PiCamera
from datetime import datetime, timedelta

def wait():
    # Calculate the delay to the start of the next hour
    next_hour = (datetime.now() + timedelta(hour=1)).replace(
        minute=0, second=0, microsecond=0)
    delay = (next_hour - datetime.now()).seconds
    sleep(delay)

camera = PiCamera()
camera.start_preview()
wait()
for filename in camera.capture_continuous('img{timestamp:%Y-%m-%d-%H-%M}.jpg'):
    print('Captured %s' % filename)
    wait()
Controlling the PiCamera using Node-RED
Node-RED offers a myriad of functionalities to control the Raspberry Pi. The only thing you need to do is to install the camerapi node:
$ cd .node-red
$ npm install node-red-contrib-camerapi
Once the camerapi node is installed, start Node-RED by going to the Programming menu, click on Node-RED. Leave the terminal window open, fire up a new browser window, and go to http://127.0.0.1:1880. You will need an inject node, and a camerapi takephoto node. Drag them to an empty flow, and connect them. Double-click on the camera pi node, you will see the following setting:

The only option that needs explanation is the first one. The File Mode option controls how the files are named. Choose Generate and the file name will be generated automatically. Choose Filemode, you can specify the file name. You can also choose to override the file name using msg.filename in the msg object passed to the node, so that you can write a function to fine control the filename.
Note
You can find your picture under the /home/pi/Pictures folder.
Now you can deploy the flow. Whenever you click the button to the left of the inject node, a new picture will be taken.
Alternatively, you can also change the options of the inject node to have Node-RED take the picture at a certain time interval by changing the repeat option.
